Leather Care

Fix large hole in leather couch

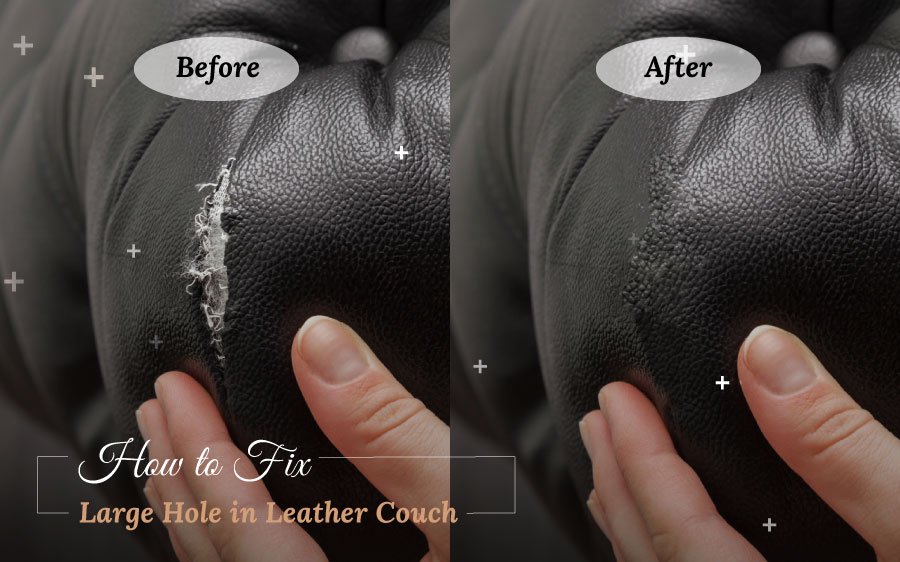
How to Fix Large Hole in Leather Couch Easily [Expert Suggestion]

Holes, cracks, and tears are all too common for even the leather couches. In general, pets are responsible for holes, to be more specific, dogs. They scratch, chew and bring out the inner cushion just for fun and pleasure.

Besides, kids often use the sofa as their personal trampoline, causing great damage to the original tenacity of the surface. Thus these kinds of behaviors lead to bruises on the surface. — So, how to fix large hole in leather couch, is a genuine question.

Let’s check out the detail.

How to fix a large hole in a leather couch?

Mending a leather hole slightly differs from fixing a tear. Holes are very tough to handle and many times require professional hands. — However, we may DIY the smaller ones all by ourselves.

Related: How to Fix Scratches on Leather Couch from Dog

Two methods:

There are basically two methods of mending it. You may either stitch + sub-patch it or sub-patch + leather filler + top-patch it. You can also put only leather adhesive and get back the taste of the original stuff.

For teeni-tiny holes:

Give strokes of leather repair adhesive into the hole. Seal it shut with adhesive. Drying takes time and until it fully dries, everyone must maintain a safe distance from the hole.

Watch your pets and kids in this regard.

For large & uneven holes:

You need a set of proper tools, to begin this process. The list includes-

  1. Scissors
  2. Leather filler
  3. Sub-patch
  4. Top-patch of the same color
  5. Leather glue or superglue
  6. Cushion, if necessary
  7. Leather color
  8. Hairdryer 

Prepare the setup:

Normally, the foam comes out of the hole. Cut it out. Then even out the edges of the hole in the form of a circle with the scissors.

If the stuffing is still coming out, remove it. If the cushion is missing, chop the newly bought foam in an appropriate shape and push it inside. You may use non-toxic fabric glue to join the new one to the original foam.

Apply filler:

Now, generously pour in the sustainable leather filler inside, to fill up any small disjointed space and smooth out the surface.

Make sure to dry out each layer of leather filler before placing the next until you make it to the surface level.

A hairdryer is a useful tool for this purpose. The filler allows great flexibility when it dries. It moves and bends along with the cushion.

Get the sub-patch:

The sub-patch may be either leather or denim.  Actually, it does not matter. Give it an inch of extra size than the hole. Then, glue the sub-patch to the top of the newly placed foam and down to the underside of the leather hole.

— Apply steady and firm pressure so that it blends in properly. The sub-patch robustly connects the leather hole and the foam.

Pick the top-patch:

Now, bring out the same colored leather top-patch. You will find it at the hind side of the cushion cover where both the cushions meet.

Manufacturers attach an extra patch over there, for emergencies like these. 

In case you do not find it there, pick an eco-friendly vinyl patch alternative from a nearby store. Be sure about its similar thickness, grain, and color.

These commercial patches usually come with low sticking capacity. — So, you might have to use a powerful glue for them.

Place the top-patch:

Carve it in due size. This is a rather difficult task. You have to place it, exactly in the right edges and places so that no overlapping takes place.

— Therefore, precise laceration is of paramount importance. Glue it to the surface and piece together all corners. This glue must fully dry, prior to using the couch. Again, using a hairdryer on low could bring you a quick result.

Superglue, sandpaper, and leather finish:

In case you are applying superglue on the commercial patch, sand it by hand and 320-grit sandpaper. Repeat this gluing and sanding process until you can feel the evenness of the surface.

After you are satisfied, dye it. Dyeing scores better with a damp sponge

This is a highly sensitive task as it has the potential of ruining all your effort until now. The new color must match the original one.

First, try it on a low-profile or dim area. So, you can control the damage, by withdrawing the dye.

You might have to color the whole exterior, to bring a uniform appearance. Otherwise, some sections will shine bright and the rest will turn out to be dull.

At last, put some premium quality leather finish on top of everything. It will introduce a dazzling look to your work.

Final Thought:

You should give it a rest before further use. Normally, a 24-hour gap bodes well for the newly repaired hole.

Fixing punctured leather couches takes your time and great resolve. You will mostly learn through trial and error, as a newcomer in leathercraft.

— But look at the savings you are making in the process. It is really worth your attention. You may also want to check out the process of mending ripped leather sofas. 

How to Fix Ripped Leather Couch

How to Repair Torn Leather Couch in a Minute

No matter how pricey your leather is, it tears. Even the exclusive  leather couches are subject to this phenomenon. Pets, children, and accidents happen once in a while.

— So, you may store small leather tricks up your sleeve, in order to handle an emergency like a pro.

How do tears happen?

Sharp objects are primarily responsible for these incidents. The paws of your cat or dog can do it. If a dog toy is tossed into the crevices or in between two cushions, you will see an unnerving digging on the part of the canine fellow.

Related: How to Fix Scratches on Leather Couch from Dog

The dog does everything in its power to retrieve the item. Knives or hard-edged objects can do it too.

Kid’s toys and rough plays are ideal items for ruptures. Pens, pencils, and other things also push through it.

— Besides, the surface of your leather furniture runs pretty tight all over the place. This strained structure gives an extra nudge when a pointed metal or glass makes contact with the top area.

Apart from careful use, many things can give a cut or tear to the leather.

What do you need to mend leather tears?

Keep a bunch of stuff at close quarters for this task. Your leather repair kit must store these items.

  1. Tweezers
  2. Palette knife or toothpick
  3. Leather adhesive
  4. Leather or denim sub-patch
  5. Hairdryer
  6. Paper towel or clean soft cloth

How to fix a ripped leather couch?

When you are fixing ripped leather furniture, you do not expect professional excellence out and out. But we can land you at close to perfection. We have the simplest solutions to mending leather cuts. It’s a breeze.

Bear with us.

The easiest method:

Apply the best quality leather patch, matching the color of your furniture surface. Just clean the torn area and the loose ends of the rip. Then stick the patch.

Believe it or not, you are done.

The most durable method:

First, clean the surrounding area of the cut with a clean cloth and a leather cleaner. Remove undetectable grime, dirt, and grease.

—  Now, concentrate on the stray fibers, bulging out of the tear. Use a pair of scissors to carefully remove those errant threads. It allows a cleaner and stronger connection at the joint.

Push the exposed foam inside and level it down by pressing. Cut the leather or denim sub-patch at least 20% bigger in size than the torn area.

Push the sub-patch through the rip with tweezers. Tweezers give you easy access and opening inside the torn section.

— Now, evenly distribute the sub-patch underneath the torn area, using a palette knife or toothpick.

Take the best quality leather adhesive. Apply this glue on the sub-patch as well as the underside of the leather with the toothpick or knife.

The knife helps spreads the glue and ensure even coverage. Also, put some at all the torn edges of the leather.

Related Tips: How to Fix Large Hole in Leather Couch

Now, bring the ripped edges together, and at the same time, press it down on the glued sub-patch. It guarantees a strong joint by securing all sides into a warm closeness.

Continue to push the edges together until the glue begins to set and turns tacky. So, the whole thing again becomes a single unit.

Use your fingers to join the still-visible seams. Thrust the surface down so that the sub-patch can stick tight at the bottom.

Remove the excess glue with a paper towel or cloth. The cloth should not add extra colors to the leather.

Therefore, you have to choose it carefully.

You can place a heavy book on top of the fixed area, for 5-10 minutes. It will provide gentle pressure so that the glue can set properly.

After you are done with this, you may use a hairdryer. It will quicken the drying stage. Make sure that nobody abuses it before the seams dry out properly.

Take a 24-hour recess, prior to using it again. The patch will hold the tear together for a pretty long time.

— It will stay firm in the face of everyday wear and tear. If the tear somehow reappears, resort to some more glue into the edges all over again.

There will remain some imperfections. Securing an invisible end result is a professional task. Minuscule holes or bulging sides of the edges may gaze at you. The outlines will show despite your efforts.

Do not take it to your mind.

Remember that this sub-patch surely serves better than rookie exterior patches and ostensible or manifest stitches on the outer area. Here goes a short instructive video clip on how to fix a ripped leather couch.

What not to do in fixing leather tears?

There is a list of things to avoid in fixing ripped leather. Those are listed here.

No super glue:  Do not apply super glue out of the blue. It does not hold water in confronting the everyday usages.

— Moreover, the glued part of the leather turns stiff which is exactly what you do not need.

No hot iron: Pressing the hot iron on the leather could result in discoloring or disfiguring. If you really have to quicken the process, use a hairdryer. Still, you must be careful about not applying too much heat.

Hairdryer alert: Real leather does not like hairdryers too much. Genuine leather needs its fair share of moisture.

Usually, 50-70% of humidity fares well.

If you dry it out completely, the leather couch will show cracks and fatigues around the rip.

Sunlight warning: Direct sunlight is no good for real leather either. It also takes out the humidity, leaving cracked skin behind. So, do not dry it in the sun.

Conclusion:

An easy call is resorting to a professional. You can do that too. But it costs a lot especially in the case of real leather.

—  Certainly, they can manage a greater look and can almost do away with the cut marks. The expenses often are a great barrier in reaching them.

Also, keep a watchful eye on what your kids and pets are up to as they get into a playful mood on the couch.

If things go rowdy, alert them.

Or you might call up your children to help you with errands while fixing the ripped leather couch. It will give them a valuable lesson about the tiresome method of mending it.

How to reupholster a leather sofa

How to reupholster a leather sofa (5 Easy Steps)

A top quality leather sofa cannot be eliminated altogether as you start developing a distaste for its outlook. A little effort could transform the appearance altogether. The greatest idea is to upholster it.

So how to reupholster a leather sofa is a legit inquiry. We are going to display the Leather Fact thoughts on this vital issue.

What tools do you need to reupholster a leather sofa?

Your tool list should include adequate leather or fabric, a flat head screwdriver, seam ripper, staple gun and staples, electric scissors or fabric cutter, chalk, needle and thread or sewing machine.

How can we reupholster a leather sofa?

Let’s face it, the DIY route requires precise tools, time and experience. But experience is not mandatory if you have a clear guideline. You are about to arm yourself with that specific know-how.

Step1: Remove old leather or fabric:

Remove old leather or fabric
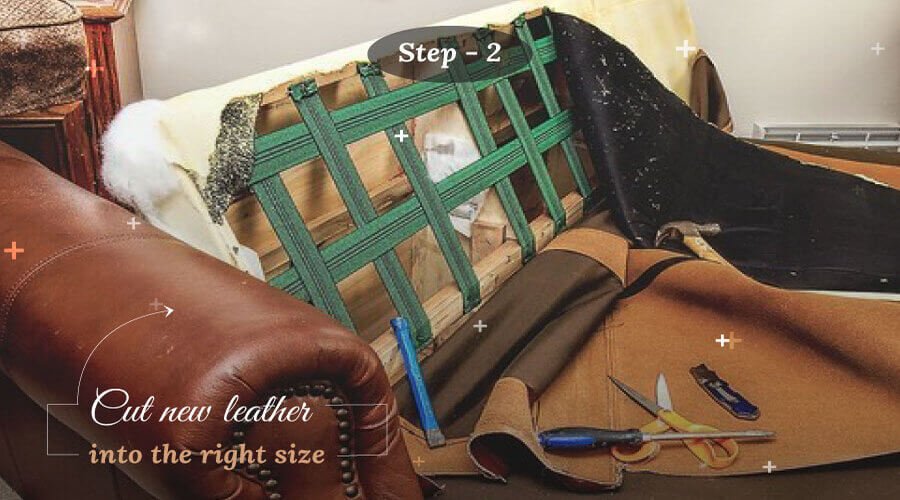
Turn the sofa upside down and then dislodge the staples using a flat head screwdriver. Restore the leather pieces to their original size using a seam ripper. Separate these dismissed pieces as they outline the precise measurement for you to follow.

Step2: Cut new leather into the right size:

Cut new leather into the right size

Take the electric scissors or a fabric cutter to shape up the new leather. But first, put the old leather on top of the new one on a flat surface. Hold them tight in place with clips or pins on all corners. If you feel shaky, get the chalk to draw the pattern prior to cutting. Allow an extra 1 inch seam across all sides for professional reupholstering.

Step3: Staple the leather on the back:

Staple the leather on the back

Begin it from the back by aligning the cut leather parts along the previous edges, underneath. Staple it with the staple gun. Pull it up strongly so that the fitting goes snug. 

Step4: Staple the leather on the front:

Staple the leather on the front

Pull and place the upper front piece bottom up and let it dangle down the back. At the top of the sofa, flip the leather piece and staple it along the upper edges of the hind piece. Now, you do not want the staples showing themselves. Flick the leather over on the border. Stick to the old seam edges all along.

For the bottom front part, place it onto the top and flip the piece there before stapling. This flipping gets the staples out of eyesight. Then smooth down the leather and drag it down the sofa to the underside and staple it there.

Again, check out the old fitting points before stapling. Take care in hiding the staples. Set the arm pieces onto the sofa and staple in place on the inside and outside of the back.

Step5: Fashion cushion covers:

Fashion cushion covers

The cushion covers need some readjustment as well. Make slipcovers and sew these pieces together with a zipper for easy pulling out and pushing in.

For more insights, watch some of the best YouTube videos on leather couch reupholstering.

When to reupholster a leather sofa?

This question could pose a significant dilemma. What bars or prompts us in this respect? Dig in.

If it is a hereditary possession that carries remarkable sentimental value, you may have to rethink. Often history bears more importance than outlook.

Time puts additional value on a piece of furniture. A decade or a century old leather sofa cannot be measured in terms of money.

A robust frame gives you all the reasons to go for reupholstering. Changing the torn and worn leather cover could bring it back to life. This is especially true for premium quality leather couches.

Consider the monetary issue as well. A new one will cost you a fortune whereas reframing the old piece could save those extra bucks.

Conclusion:

Slip covering could be a shortcut and low budget solution to a leather couch reupholstering. Another way is to clean the sofa using the best couch cleaners.

However, it is your preference after all. Tired and rugged looks of your sofa can easily be revamped using the right kinds of tools and expertise. Many people jump into new ventures to refresh their mind. It gives them the

How to clean a leather sofa

How to clean a leather sofa

Usually, real leather products last for a lifetime. But you need to put in the work for it. Regular cleaning, conditioning and a little maintenance plan can land you at your ultimate goal. Naturally, you would love to make the most out of your bucks. Then let’s explore the ultimate guide on how to clean a leather sofa.

How to clean a leather sofa?

LeatherFact experts point out that light colored leather sofas must be cleaned twice a year whereas once a year is plenty for the deep colored ones. Here, we are divulging the secrets regarding how to bring back the shiny look of a leather sofa.

The simplest leather cleaning method:

  • Take baby soap in water and wring out a microfiber cloth in it.
  • Wipe the leather sofa surface gently.
  • Now, use another microfiber cloth to clean off the residues. 
  • Throw away the soap water into the basin after you are done. Notice the color of the filthy water. If you do it once a month, your leather couch will feel like new at once.

The easiest professional leather cleaning method:

  • Use a vacuum cleaner to eliminate dust, particles and dirt off the surface and inconspicuous angles. Dust it in case of lingering dirt.
  • Put half water and half vinegar to form a sofa leather cleaner. Stir it properly so that it mixes up well.
  • Soak microfiber cloth in it and wring out the cloth.
  • Rub the damp cloth (not wet cloth) on the surface of the leather. Do not rub backward and forward as it weakens the leather and escalate wear & tear.
  • Drying is one of the most vital segments of this task. Give it at least a good night’s rest.
  • Doing it once or twice a year will keep your leather couch disinfected as well, apart from maintaining a bright appearance.

How to remove ink stains from a leather sofa?

Leather Sofa Cleaning

Stains are real enemies to clean a leather sofa and they must be dealt with on a then and there basis. No ifs and no buts. Well do not worry as we have got the effortless ink solution for leather right here.

Finished leather:

  • Soak a cotton swab in rubbing alcohol.
  • Press the swab lightly against the ink stain. Carefully avoid the areas unaffected by the smear. Every time you touch the spot, swap the swab for a fresh one. The mark will gradually fade away.
  • Stroke or tap the area with a soft and clean cloth.
  • Dry it properly.

Unfinished leather:

  • This is too delicate and rich for a rookie to handle. Take professional assistance.

Keeping pens close by the couch is a great way of paving disasters. Your kids might like to do their homework on the sofa, or in some other way, ink stains could possibly mar the appearance of the priciest furniture.

How to remove grease stains from a leather sofa?

If you stick to the regular sofa leather cleaning schedules, you will barely notice any grease stains at all. However, things might happen out of nowhere and a little trick up your sleeve could save you big time.

Unmistakable grease stain removal method:

  • Strew some baking soda right on top of the grease.
  • Give it at least an hour or more.
  • Use a soft and dry cloth or brush to wipe it out of the surface.
  • There are a number of highly useful leather degreasers designed to handle it like a pro. But you must apply it in an inconspicuous zone. So things do not spiral out of control.

How to condition a leather sofa?

Leather loses its suppleness and moisture over a period of regular use. Unless you restore these qualities, the sofa will inevitably look poor. Deep conditioning can easily retrieve the fresh and new feel of the leather couch. However, all cleaner residues should be wiped away before going for conditioning.  All kinds of cleaning should be followed with conditioning as well.

The easiest leather conditioning method:

The all DIY leather conditioning method:

  • Blend lemon or flaxseed oil with water in equal portions.
  • Plunge a soft cloth into it and wring it out properly.
  • Place the damp cloth on the leather surface and gently swipe along on all nooks and corners.
  • The following day, take a fresh and dry cloth to mop it up one last time. 

How to keep stains away from a leather sofa?

Genuine leather stands a greater chance of attracting stains. So you may have to adopt drastic measures to slash down the probabilities of accidents. Let’s check out the most pragmatic path to a stain free sofa.

  • Mold & mildew: Warm and humid climates induce mold and mildew attacks. Apply wax or anti-fungicidal silicone resin to avert it. Sound ventilation goes a long way in this respect.
  • Immediate action: Whenever accidents take place, go for an immediate action. Chunk out the solid food or dirt. For grease and ink stains, adopt one of the methods stated above. Also, a solution of lemon juice and tartar cream in equal portions can work wonders for dark stains. Leave the mix for 10 minus and then mop it up.
  • Conditioning: Water based solutions can dry out the couch. It may initiate brittleness. Apply a fitting leather conditioner for sofa to avoid this kind of scenario, following each cleaning session. Conditioners immediately bring back the natural oils and lends a soft sheen. Put a cap on the use of water. 
  • Regular cleaning: Simple weekly or bi-weekly cleaning with a damp microfiber cloth gives outstanding tenacity and look of the leather sofa. It genuinely dampens the long term hassles and greater concerns.
  • Manual: You have spent a fortune on the leather couch. Now read the instruction manual you received along with it. Do contact the shop or manufacturer before running after other professional assistance. The guide will lay out a proper course of action for leather sofa treatment, in case things happen.

How to repair cuts on leather sofa?

Cuts on leather couches are way more difficult to take care of all by yourself. It takes steady hands. However let’s jump in on a DIY.

  • Clean the area with a leather cleaner.
  • Cut off the stuffing bulging out of the hole.
  • Use a long metal tool to reach into the hole in order to paste a fitting leather glue in the inner side of the cut.
  • Clean the excess glue off the surface with a cloth slightly dampened with leather cleaner immediately after you are done with patching the glue.
  • Place your thumb on one side and gently press it towards the cut in order to strengthen the glued joint. You have to hold it for either a short or long period of time, depending on the surface tension. Do not treat it with a hair dryer for quick heat and dry as it will negatively impact the lifespan of the leather.

Better if you leave this task for the professionals. Most of the time, DIYs are a recipe for disaster.

How to repair flaps on a leather sofa?

Flaps can greatly restrict the beautiful look of the sofa. Luckily, treating leather flaps goes quite easy and simple as they do not cut all the way through.

  • Again, rub the affected area using a leather cleaner.
  • Apply the leather glue on the underside of the flap.
  • Push the flap back down on the leather.
  • Drive out excess glue from the surface using a cloth dampened with leather cleaner.
  • Allow it to air dry for at least an hour.

How to handle scratches on a leather sofa?

Leather is timeless but not immortal unless taken good care of. Scratches pop up once in a while to obliterate the beautiful look. Pets and kids are two of the usual architects in this respect. We need to figure out a process of maintaining a polished outlook anyway.

  • Use a leather cleaning solution to clean the zone.
  • Take mild oil on a cloth or a cotton ball and lightly mop up in a circular move.
  • Air dry it after removing the remnants of oil.

Conclusion:

The perfect leather couch gives an ultimate luxurious vibe. Your cleaning techniques weigh a lot in this respect. Handle daily wear-tear, cuts and scratches just like a professional. However, you must arrange the best leather kit to maintain your upper hand over any circumstances. Keep an eye on your manufacturer guide on all occasions before setting off for  DIY. For sure, your leather sofa is going to hold its softness and suppleness for several lifetimes.

How to dye leather couch

How to Dye Leather Couch

Leather couches are the best until they get stripped of the color. It could really look ridiculous, in absence of their glorious sheen and heartwarming color. It does hurt your eyes but not necessarily your comfort.

However, a premium appearance is just at arm’s length. LeatherFact lays out the easiest leather sofa dyeing method, to this day. Let’s dive into the details.

Why should you consider dyeing a leather sofa?

Even the most durable leather sofas give in to everyday wear and tear. There are several reasons for recoloring the couch. We have mentioned a few.

  • Aging leaves the sofa deprived of its original grandeur. Loss of color is responsible for this deemed appeal. You need to redo it, once in a while.
  • People crave leather furniture. Not everyone can afford a fancy leather item. So, wise ones find old couches and repaint them as real leather furniture lasts a lifetime or several generations. It brings them comfort without digging too deep into the wallet.
  • Burns, scuffs, holes, scratches, tears, water intrusion, accumulated grease & dirt, etc damage the color. When you fix these issues, you might have to go for a color retouch as well.

How to dye leather couch?

How to dye leather couch

The best leather couch costs a fortune and you want it to hold onto its youthful appearance all the way. Dyeing can retrieve the old appeal, to the fullest. This is particularly not a difficult thing to handle. During your holidays, you may accept this new challenge. We have illustrated a precise sofa-dyeing process, for you.

What do you need?

You need a bunch of stuff.

  • Pair of gloves
  • Leather cleaner
  • Soft cloth
  • Acetone or leather deglazer
  • Leather dye
  • Sponge
  • Leather finish
  • Water in a spray bottle 
  • Hairdryer 

Set up the stage:

Wear the gloves prior to starting the job. You will handle a number of chemical substances. No harm should happen to your skin. Place a piece of cloth underneath the couch. So, dyes and cleaners do not ruin the floor. 

Also, put tapes on the wooden sections of the couch. It prevents the dyes and solutions from causing havoc to them. First, you must clean the leather couch. This is a mandatory prerequisite for the advanced steps. Remove waxes, oils, greases, and all other unwanted debris. You can do it with warm soapy water.

Deep clean:

The sofa requires a deep clean. A fine leather deglazer or nail polish remover can serve your purpose, in this regard. It strips the couch of its previous finish coat. Old pigmented finishes and outer coats mar the vigor of the new color, to some extent.

Plunge a coarse and clean cloth into the deglazer and rub it all over the place. This task effectively prepares the leather for refinishing. Wait an appropriate amount of time as the cleaning solution gets evaporated off the surface. It helps the new color to sit tight.

During this time, keep all flammable components away from your workplace. Deglazer, acetone, denatured alcohol cleaner, and things like these could be highly inflammable.

Apply leather dye:

Get the surface a little wet, using the sprayer. It helps the exterior section easily catch the dye. The colorant also spreads out evenly, thanks to the moisturized top. Coloring is not a one-off job. You may have to do it twice or thrice, depending on the condition.

Take a sponge and begin with the first coat. The trick is not trying to achieve perfection on the very first go. Use light pressure along the exterior segment. Go for smooth and slow moves, rather than hurrying it down the surface. Do it in small patches.

Dry the first coat with a hairdryer. You will obviously notice an irregular color distribution. Try to match it the second time or the third time. But every time, you must dry it out properly. Let the final coat dry naturally.

Rub leather finish:

Buy the best leather finish in the market. It lays out a glossy look to your work. The finish is vital for durability as well. It safeguards the dye. See the application method, in the instructions. Usually, finishes must be sprayed on the surface. Then, scrub a clean damp cloth around, for a steady outcome or even distribution. 

How much does it cost to DIY dye a leather couch?

The best leather colorant toolkit is your ultimate cost. For finishing, cleaning, and conditioning you might need a few extra bucks. But the opportunity lies elsewhere as you can fix the leather couch several times. Therefore, the expenses are quite trivial, in comparison to the cost of professional help. However, you must pay it out in time and labor.

How much does the professional dyeing of a leather couch cost?

Changing the color of your leather couch costs around $400-$1000, on average. It could go up, depending on the condition. A poor physical structure could lead to an even greater charge, about $1200-$1500. Cleaning, conditioning, finishing, fixing tears, holes, and scuffs could add up to such a large sum. So, a good way is to DIY it all together, at a low cost.

Conclusion:

In short, we can say that dyeing the leather couch is not a laborious task in itself, rather a technical job. If you have the right tactics up your sleeves, you can get down to the business right now. Our experts have explored the shortest leather coloring method, to this day. You can save big bucks from this day on. Your leather sofa should look its best all the time. In case you have something to share or inquire about, we encourage you to comment here. Hope to get back to you very soon.

How to Clean Faux Leather Couch

How to Clean a Faux Leather Couch: The easiest path

The care and maintenance of real & faux leather go quite different ways. artificial leather, pleather, artificial leather, or whatever you call it, its man-made nature calls for a unique variation in this respect. Again, chemical components could stiffen or compromise their quality, to a great extent.

So, its upkeep requires a proper set of actions. LeatherFact illustrates the easiest faux leather couch cleaning technique for you. We have outlined some vital maintenance instructions too. Let’s get going.

How often should you clean a PU leather couch?

You must vacuum clean the artificial leather couch every week. Regular cleaning goes a long way in ensuring its durability. Pay special attention to all cracks and crevices, to bring out the last remnants of dust and debris.

Uplift the cushion and vacuum the underside. But this is not the deep clean we are going to discuss in this write-up. Deep cleaning, once in about 6 months, can get you the desired outcomes.

What is needed for faux leather couch cleaning?

It really depends on which method you are adopting. Also, general cleaning and purposeful cleaning call for a variation. Here we are listing the things required for special cleaning.

-Vacuum with a brush

-Faux leather cleaner/ mild detergent/ rubbing alcohol/ distilled white vinegar/ baking soda/ Vinyl stain remover/ rubbing alcohol/ vinegar+olive oil

-White clean rag or paper towel.

-Liquid dish soap 

-Laundry detergent 

-Spray bottle 

-Baby wipes 

-Conditioner specified for your couch 

Our experts have picked all the cleaning components for the task. You can buy either a commercial product or introduce a homemade patch to serve the purpose. It is entirely up to you.

How to clean a faux leather couch?

Before we get straight into business, check out the manufacturer-provided care tag real quick. It will give you valuable insights into which ingredients suit your artificial leather couch. Now, we will discuss the leather cleaning phases in detail. You can do it both ways, machine wash or manual in case the manufacturer allows it.

Machine wash method:

This is all too simple. Get the stuffing out if it has removable covers. Mix the cleaning solution into the washer. Put the machine on a cold and gentle cycle. Air-dry the covers afterward. You can condition it if necessary.

Manual wash method:

The label or instructions might say otherwise by standing against machine wash. You have the manual guidelines here as well.

Vacuum it:

First off, mop up the surface with a vacuum cleaner. It removes all the visible particles and some of the invisible ones too. Thus, you get a spruced-up couch top to work on.

Cleaning solution:

You may buy the best faux leather cleaner. But many people opt for a homemade component. Whatever you pick, apply a small amount in an inconspicuous area. This test will give you a clear idea of what is about to show up.

In absence of a professional leather cleaner, soap and water perform the best, for polyurethane leather. On the other side, vinyl leather does well with baking soda onto a rag. These are valuable tips for you to keep in mind in case the label or instruction goes missing.

All the cleaning ingredients are basically okay, except for rubbing alcohol. It might leave the pleather couch as dry as dust. Alcohol sucks out oils and blows a scorched-up look on it. So, if you choose it, do not use it frequently.

Leather cleaner, mild detergent, dish soap, distilled white vinegar, and baking soda are good. Put a few drops of dish soap or a tablespoon full of detergent into warm water. You are pretty much done with the solution. These are heavyweight combatants against sneaky oils and grease. It also snaps enduring food stains.

Spray & pat the surface:

But the solution works better if you spray it on the surface. It guarantees even distribution. You can use a soft and non-abrasive cloth for dusting off. Get to the stains and leftover food marks and keep busy there for a longer period of time. This is where you need to pay attention. Initially, do not just scrub along but pat the cloth, on those sensitive places. 

Wipe it:

After you have almost finished discarding the visible marks and spots and specks of dust off the surface. Spray some more of the cleaning solution if necessary. The couch should not get soaked in water. A little wetness is enough to clean it up.

Be careful about residue soap. The goal is to completely freshen up the couch, from the remnants of soapy water. Use a damp white cloth for swabbing the top. Colored rags might render their traces of dye to the pleather couch.

Condition it:

Give it plenty of time to air dry. You may resort to a fresh piece of clothing to soak up the water. Then, go for conditioning. Water exposure often reveals cracks and gets the couch all dried up. 

Conditioning provides the necessary oils to retrieve its shiny appearance. A gentle massage of the best artificial leather conditioner can do the trick. Besides, consider a protective finish as it safeguards the couch from UV rays.

How to maintain pleather couch cleanliness?

There are several techniques from our leather experts. These are designed to ensure the durability of the product, in the long run.

No detergent:

If possible, do not resort to harsh detergent cleaners. It introduces dryness. Regular use of it will cause irreversible disruptions on the surface.

No abrasive cloth:

An abrasive or colorful cloth can damage the exterior quite badly, with rough scratches and patches of dyes. Stay away from them even while you are going for those mild weekly clean-ups. Microfiber cloth is always the top choice, in this regard. Also, use a damp cloth and not wet cloth. Wring out the extra water.

Test it:

Do not introduce a new leather component or solution all over the place, at the very first go. It might cause havoc, with adverse reactions. Always test them in an invisible area and dry. If it is satisfying, you can apply it, in other places.

Insignificant stain:

For tiny stains, you may use baby wipes. It has wonderful properties that instantly remove the spots. Jump into action as soon as you see things falling on the sofa surface. It increases the probability of complete removal of the stain.

No bleach:

Regardless of the incident, you should never resort to bleach. It dries up leather, in an instant. Its corrosive effects also downplay the fabric structure of the couch, making it vulnerable to future accidents and spots. Flashy stain removal capacity can end up in a total loss, with cracks and compromised surface.

UV hazard:

Direct sunlight greatly damages the artificial leather sofa. Place it away from doors or windows that expose it to the sunlight. UV rays are mostly responsible for cracks and discoloration. 

Conditioner & protectant:

Use of conditioner and protectants serve your purpose. Conditioners hold onto necessary moisture and repel cracks. Protectants prevent harsh weather impacts, dust, and debris, reducing the need for regular cleaning.

Conclusion:

Well, you have figured out the easiest way to cleaning up a faux leather couch. Now, save your pretty penny and do it all by yourself. Stick to the guidelines, provided by the manufacturer and this article. You will be fine. Besides, it will inject new life into the artificial leather sofa, with a strong vibe and great look.

Fix Scratches on Leather Couch from Dog

How to Fix Scratches on Leather Couch from Dog

Your premium quality leather couches are always prey to the mischiefs of the dog. Besides, kids and someone’s inattentive actions could result in scratches.

Scratches, scrapes, and burns call for corrections. It brings back life to one of the costliest items in your house.

— So, let’s delve into how to fix scratches on leather couch from dog.

Why do scratches happen?

In short, the long nails of your dogs and cats are responsible. They sit and play on top of the sofa and the outcome is a bunch of ugly scratches.

Biting and chewing on their part can also be held accountable. Razor-sharp pet teeth can do more damage than we are willing to give them credit for.

Humans are also at fault for it. The kids especially disregard the sensitivity of the cool leather couch. They might express their rage or evil designs on the couch.

Their toys and study materials occasionally end up on it. — For example, light touch of the pen nibs, rulers, compass, or toys can do it.

Sharp-edged objects can do it too. No matter how careful you are around the leather sofa, it catches some marks over the years.

These spots almost ruin the beautiful appearance of the furniture. But scratches are never any serious concern for leather.

Be with us.

How to fix scratches on leather couch from dog?

Luckily, you can restore the genuine leather couch to its previous glory, with some easy techniques. You need leather repair tools, depending on the type of scratch.

  1. Leather cleaner Scissors
  2. Wax coating
  3. Olive oil
  4. Leather glue
  5. Leather filler
  6. Leather dye
  7. Leather finish
  8. Soft cloth
  9. Hairdryer

How to fix minor leather scratches?

This is nothing extraordinary. Put a little olive oil or wax balm on a soft cloth and rub it across the scratch. It will go away. The best wax coatings are good for fading, cracking, and drying too.

—  Though some master craftsmen advocate against oil, none have any reservations toward the leather balm.

If the scuffs are almost imperceptible or very insignificant in size, a simple damp cloth can do the magic as well. In that case, you even do not need any wax or oil.

— However, some of our leather experts are dead against using oil of any kind, due to the porous and organic structure of the leather.

The oil takes a permanent seat down there and cripples the strength of leather over time. Oils could eventually endorse and stimulate the decaying process.

How to fix major leather scratches?

A deep scratch identifies itself with bare threads. You can see exposed fibers bulging out of the affected area. This is a signal for tighter preparation. Get your things together for a lengthy task ahead.

Related Next: How to Fix Large Hole in Leather Couch

Clean the zone:

First, clean the scratch area with the top leather cleaner and a soft cloth. Now, carefully sever the bare threads using the scissors. The surface of the scrape should be leveled out right around this time.

Glue it & fill it:

Apply a proportionate amount of premium leather glue on a soft cloth. Then, benignly rub it across the scratch.

Continue this process until it smooths out around the edges. You need a high-quality leather filler to stuff the cavity. Even out the dip with the surface.

Dry it:

For filler to get activated, you must dry it out according to the guidelines. Each layer of it requires individual drying.

So, a hairdryer could be of huge help. After the filler is sapped of its moisture, sand down the damaged zone.

Cleaning & dyeing:

Massage some alcohol cleaner and let it sit and dry. Bring out the classic leather dye as it is time for rejuvenating the couch.

— Be careful about the color match and use a sponge to apply it. Do it in an inconspicuous area first. So, you can easily go for damage control.

Finishing:

After all is set and done, give a final touch of the best leather finish. It literally reincarnates your leather sofa. A perfect finish can retrieve the shiny look and great feel.

Related Tips: How to clean a leather sofa

For deep leather holes or tears:

You may take a trip to the detail as it is a whole new story, requiring patches and tricky tactics. Fixing a leather hole or mending a torn leather couch takes time and effort as well.

How to stop your pets from hogging the leather couch?

There are some real-world solutions to stop your pets from making it to the leather. We are highlighting the easiest leather protection means for you.

Arrange the dog bed:

Train the puppy for its bed. So, it does not attempt to sit on the couch.

Toy ploys:

Set up the pet toys away from the leather sofa. The pet will remain busy at a safe distance.

Cover the surface:

The pets somehow manage to get on board. Shut down the possibility of incidents, by placing a cover around the couch. You will find it in the market, — exclusively outlined to clear out the furniture from the pet paws.

Groom the pet:

Get the puppy under the nail trimmers. So, there is no chance of friction left out in the open. Keep a shorter coat as it will slash down the fur. Bathe and clean the skin, to make it dander-free.

Reinforce good behavior:

The couch is not for pets. The better they get it, the safer the sofa remains. You can resort to positive reinforcement training. — Use some treats and appreciations, to accustom them to their places.

There is no cat-proof or dog-proof leather sofa. You need to protect, by shutting out the pet altogether from the room.

Or you may introduce these proven protective approaches.

Related Topics: How to Repair Torn Leather Couch 

Final Thought:

You galloped through this write-up because you want to save a pretty penny, by avoiding a call to the manufacturer or the professionals.

— You know they charge a lot for real leather fixations. But with a little patience and a good set of instructions, you can do it all by yourself.

This is more of masking the damage as leather scratches are barely any concern for leather admirers. It happens all the time.

Restore Worn Leather Couch

How to Restore Worn Leather Couch

Basically, cleaning, conditioning, and coloring can retrieve the old aristocratic look of the leather couch. Sometimes, there are cuts and bruises on the surface. Those concerns must be dealt with as well. Water damage and ink stains pose challenges too. Let’s get into the details of the subject matter.  

Cleaning:

Cleaning is the initial step towards the goal. Your vacuum cleaner can do it within minutes. Carefully eliminate all dirt, debris, particles, and dust. You may want a hand from the best leather cleaner in the market. 

Rub it in a circular motion and then wipe off the surface with the best microfiber cloth. This pH-balanced leather treatment breathes new life into leather while helping to restore and protect neglected leather. Restores and maintains a true natural leather scent. 

Or you may use a baby soap for cleaning the leather sofa with it. Once a month regular scrubbing will also do the trick.

Conditioning: 

Dryness, exposure to the sun, and lack of moisture ditch the flexibility and suppleness of a leather couch. It can instantly retrieve the dazzling appearance. So, all cleaning should immediately be followed by conditioning as well.

If any residue of dirt or oils are left, the best leather conditioner wipes that right away. It protects from cracks and brittleness. Apart from proper nourishment, the flexibility remains intact.

Rub the conditioner on the leather surface using a cloth, brush, or sponge. Go for thin coats all over the place. Gentle touches are the key to perfect conditioning.

Dyeing:

Leather outlasts almost all of your other furniture. Durability takes a toll on its color. Daily wear and tear force a dull look. Therefore, dyeing can revitalize it to the previous vigor. A fine leather dye together with a microfiber leather applicator takes care of recoloring.

You may either stick to the previous color or opt for another one altogether. But the dye should not peel off or crack once it gets dried. Quality matters a lot. You might need to apply a deglazer or alcohol to clean the leather. It ensures smooth penetration for even coverage.

After you are done with coloring, use a leather finish. It guards the stunning glossiness. This thing also lends water-resistant properties and turns the leather top peel & crack proof. Here, you need to apply light coats again.

You must start in an inconspicuous area of the furniture. So any mistake can be amended. Moreover, place some newspaper or protective papers around the couch. It prevents dyes from discoloring the floor. Also, let the leather cleaner and conditioner sit before you go for dyeing.

What is the cost of leather couch restoration?

Leather sofa restoration could start from $500-$1000 USD. however, several factors cause variations in this range. What you ask is what you get. Normally, people look for scratch-and-spot repair and deodorization. Sometimes, customers ask for anti-allergen treatment or UV protection for their leather furniture.

The depth of your requirements could add up further costs or slash down the average range to some extent. The job is seldom restricted to cleaning and conditioning only. Scratch and cut sizes and damaged area proportions heavily contribute to the expenses. 

Conclusion: 

Usually, cleaning, conditioning, dyeing, and glossing do the job. But pets and children are often responsible for cuts and scratches on the sofa. Those need to be addressed too. The cushions become saggy or flat, causing some discomfort to the eyes.

Besides, pet urine and abrasions damage your dream leather couch. Ink stains are also heavyweight enemies of the sofa. This blog on ‘how to restore worn leather couch’ exclusively deals with the basic concerns. 

We have discussed the individual issues in different articles. Check out the other Leather Fact write-ups. If you follow our primary guidelines, you can rejuvenate the leather couch back to its original form.

Scroll to Top